You can change the MultiVariants UI language for the product page very easily. English is set as the default language. Aside from that, we have a few more ready-to-go languages for you.
On the Translation page, you can change the titles and labels of different buttons, instructions, and alert messages. Here, you can also change the currency sign.
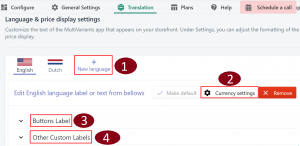
1. + New Language
Multivariants come with six ready-to-go languages. English, Dutch, Deutsch, Français, 日本語, and Italiano are the six ready-to-go languages.
If your language is not on the list, don’t worry, simply change the texts with your language.
To choose one from the available languages:
➜ Go to Translation
➜ Click on New Language
➜ From the available list, click on Add Language to add your preferred language.
* This won’t change the admin panel language. The change will take place in your store so that customers see everything in their language.
2. Currency Settings

You can change the currency label, symbol, separator, etc to your preferred language. You can also choose whether you want to show the currency icon before the price or not.
➜ Language name: You can enter the language name that you’re preferring to use.
➜ Short key for the language identifier: You can set the short key for any language identifier from the “Setting”. Suppose, for the English language, “en” is used as the identifier or language code. For the Italiano language, “it” is used as the identifier or language code. You can set it as your own preference.
➜ Currency: Change the currency title if you want to change it. For example, let’s you need the Chinese language. And the Chinese language isn’t available on the list. So you can pick English or any other language and change it to your language. For English, the currency is “USD”. now you need to change it to “Yuan”
➜ Currency Symbol: Change the existing currency symbol from here. This helps when your language isn’t on the list.
➜ Decimal Separator: “.” (dot) is used as the decimal separator. For example, 10.23. But if you need, you can change it from here.
➜ Thousand Separator: Usually most countries use comma (,) as the thousand separator. (for ex: 1,080) But you can change it if the comma is not used as a separator in your language.
➜ Minimum number after decimal separator: by default, the value is 0. So if a number doesn’t have any fraction value, it won’t show any decimal value. But if you change the minimum decimal value from 0 to for example 2 then you will see two 0 after the decimal even if the number doesn’t have any fraction value.
➜ Maximum number after decimal separator: You can choose the number of decimal digits you want to display for the price. By default it is set to 2 (for ex: 15.83). If any fractional value has more than two digits then it will round up to the nearest value.
Now, don’t forget to save the changes before you leave.
3. Buttons Label
If you don’t find your language in the list or you want to make changes to the existing button labels, then this is where you can do that.
MultiVariants comes with two action buttons, “Add to Cart” and “Checkout”. And one optional action button, “Add more”. If you want to change the title of these two buttons, then follow these steps:
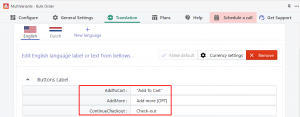
➜ Go to Translation
➜ Click on “Buttons Label”
➜ Now, replace the label with your preferred title and language.
➜ Save the changes.
* This change will take place to all of your products where MV is applied unless you changed it from any specific ruleset.
4. Other Custom Labels
On the product page, MultiVariants displays different labels, information, and alert messages to let customers know what to do. For example, the Number of stock, minimum/maximum order limit they need to choose, etc
If you don’t find these messages in your language or you may need to change some of them, you can easily do it from here.
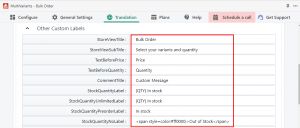
To make the changes,
➜ Go to Translation
➜ Click on “Other Custom Labels”
➜ Now, replace the label with your preferred title and language.
➜ Save the changes.
Here are the custom label fields you will see:
➜ Store Title View: This is the generic field for all of your ruleset titles that will be displayed on the product page. By default, the title for every variant listing is “Bulk Order”. You can apply different titles for the different rulesets. The setup will see in each ruleset setting or check here.
If you don’t change the title from the ruleset setting, this default title will be displayed. You can choose not to show any title at all, just turn it off from the ruleset you created.
➜ Store View SubTitle: This Sub Title is displayed under the store title on the product page. With this title, you can give an idea of your product to your customer. By default, it shows “Select your variants and quantity”. But you can change it and use any Sub Title according to your own preference. If you want to display different Sub Title for different products, then set that from the ruleset setting, for details click here.
➜ Text Before Price: The title “Price” displays for each variant of a product. By default, it shows “Price”. But any text can be added here or can be changed to any language. If you change the “Price” title from here then it will be working for all products that are using MultiVariants. It can be hidden, shown, or changed for any particular product from the ruleset setting, for detail click here.
➜ Text Before Quantity: The title “Quantity” shows the quantity field of each variant of a product. By default, it shows “Quantity”. But you can replace it with your own words and language. If you change the “Quantity” title from here then it will be working for all products that are using MultiVariants. It can be hidden, shown, or changed for any particular product from the ruleset setting. To make changes for individual products, check here.
➜ Comment Title: If you’re offering the “Custom text” feature to your product then you can set the custom text title to your own preference. By default, it shows “Custom text”. You can use any text here to display before the custom text field on the product page.
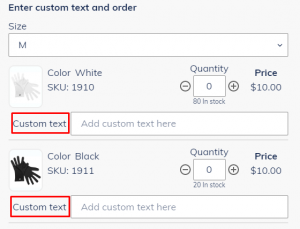
➜ Stock Quantity Label: This label works when your product is enabled for “Track quantity” but not for “Continue selling when out of stock”. It displays the available stock of each variant on the product page. By default, this is “{QTY} in stock” For example, if one of your variants has 21 items in your Shopify inventory, then it will show “21 in stock” on the product page for that variant. Here, {QTY} is a dynamic HTML tag that displays the available stock quantity (numerical value). If you want to change the label and also want to show the number then make sure {QTY} is written as it is, but you can change the position of {QTY}.
➜ Stock Quantity Unlimited label: This label works when your product is enabled for “Track quantity” and “Continue selling when out of stock”. It displays the available stock of each variant on the product page. By default, this is “{QTY} available” For example, if one of your variants has 21 items in your Shopify inventory, then it will show “21 available” on the product page for that variant. Here, {QTY} is a dynamic HTML tag that displays the available stock quantity (numerical value). If you want to change the label and also want to show the number then make sure {QTY} is written as it is, but you can change the position of {QTY}.
This label works as long as you have products in stock. When it is stock out then the next label “Stock Quantity Preorder Label”l kicks in. It happens only when you enabled “Track quantity” and “Continue selling when out of stock”.
➜ Stock Quantity No Label: If any variant of your product is out of stock then you can display the “Out of stock” message in the manner of your own preference. If you change it, it will be changed for all the products that are using MultiVariants. If you want, you can also display different “Out of stock” labels for different products using the ruleset setting, for detail click here.
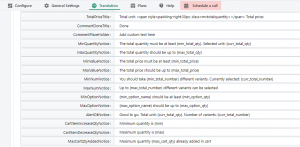
➜ Total Price Title: If you are allowing your customers to see the “Total Price” on the product page after selecting the quantity then you can decide how to show it. You can change the labels “Total unit:”, and “Total price:” Also, it’s possible to change the displaying style.
➜ Min Quantity Notice: If there is any minimum quantity restriction applied on your product then a warning message will be displayed reminding your customer of the minimum quantity. You can change the warning message in accordance with your preference using this field. It will be applied for all the products using MultiVariants with the minimum quantity restriction.
➜Max Quantity Notice: If there is any maximum quantity restriction applied to your product then a warning message will be if the customer tries to exceed the maximum quantity. You can change the warning message in accordance with your preference using this field. It will be applied for all the products using MultiVariants with the maximum quantity restriction.
➜ Min Value Notice: For the minimum value restriction on any product, a warning message will be displayed showing the minimum order value. It can be changed using this field. This message will be displayed for all the products that are restricted by the minimum order value.
➜ Max Value Notice: For the maximum value restriction on any product, a warning message will be displayed, if a customer tries to exceed the maximum order value by adding more quantities. It can be changed using this field. This message will be displayed for all the products that are restricted by the maximum order value.
➜ Min Num Notice: If you’ve set a minimum variant restriction on your product then a warning message will be shown until that is fulfilled by the customer. This warning message can be changed from this field and it would be applicable for all products that are using minimum variant restrictions.
➜ Max Num Notice: If you’ve set a maximum variant restriction on your product then a warning message will be shown if any customer chooses quantities using more variants. This warning message can be changed from this field and it would be applicable for all products that are using maximum variant restrictions.
➜ Min Option Notice: For the minimum restriction per option on any product, a warning message will be displayed showing the minimum option that should be taken. It can be changed using this field. This message will be displayed for all the products that are restricted by the minimum option restriction.
➜ Max Option Notice: For the maximum restriction per option on any product, a warning message will be displayed if the selected quantities exceed the maximum option restriction. It can be changed using this field. This message will be displayed for all the products that are restricted by the maximum option restriction.
➜ Alert Ok Notice: If all the restrictions are fulfilled by your customer then the “Add to cart” will be activated and a message will be displayed saying they can proceed with the order, total unit, and the number of variants selected. You can remove or can make changes to this message by using this field. Just make sure, you’re not making any change on {}.
➜ Cart Item Increase Qty Notice: If customers reduce or remove any item from the cart and then if the product doesn’t meet the limit then the system will display this label to inform the customer to increase the quantity. It will also display the MOQ of that variant. By default, the label is “Minimum quantity is {min}. Here, {min} is a dynamic HTML tag that displays the MOQ (numerical value). If you want to change the label and also want to show the MOQ number then make sure {min} is written as it is, but you can change the position of {min}.
➜ Cart Item Decrease Qty Notice: If customers increase the quantity of any item from the cart and then if the product exceeds the quantity limit then the system will display this label to inform the customer to decrease the quantity. It will also display the maximum order quantity of that variant. By default, the label is “Maximum quantity is {max}. Here, {max} is a dynamic HTML tag that displays the maximum order quantity (numerical value). If you want to change the label and also want to show the MaxOQ number then make sure {max} is written as it is, but you can change the position of {max}.
➜ Max cart Qty added Notice: If customers added the maximum quantities to the cart for a product and after adding the max quantities when they return to the product page, there will be displayed a warning message to inform the customer that the Maximum quantity is already added to the cart. By default, the label is Maximum quantity {max_cart_qty} already added to the cart. Here {max_cart_qty} is a dynamic HTML tag that displays the maximum quantity (numerical value) that is already added to the cart. If you want to change the label and also want to show the Max quantity that is added to the cart then make sure {max_cart_qty} is written as it is, but you can change the position of {max_cart_qty}.
Still, if you face any further issues or need help, feel free to contact us. Our support team will be happy to help you.
You can always reach us via
- Support ticket from MultiVariants app
- Live Chat in MultiVariants app
- Direct email to support@multivariants.com
So, Good Luck! And happy selling with MultiVariants.