If you are using the MultiVariants – Bulk Order app (Professional plan) for minimum/maximum quantity, number of variant restrictions, bundle quantity (dropdown), or incremental increases quantity with your Shopify store, you may need to apply the same restrictions on the cart page to restrict customers placing order within your required conditions.
To apply the restrictions or validation on the cart page, you will need to add a few simple CSS classes and attributes into your cart page template (liquid) file like cart.liquid or cart-template.liquid. It may be different based on the theme you are using.
Don’t worry, it will not break anything on your site (even if you uninstall the app).
Follow these steps:
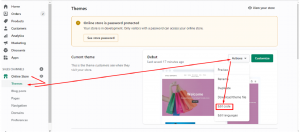
Step 1: Navigate to the Shopify admin panel and click on “online store”.
Step 2: Now click on the “Action” button of your current theme.
Step 3: After clicking a dropdown will be shown, Now select “Edit code”.
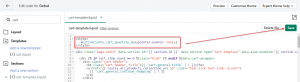
Step 4: Click on the cart.liquid or cart-template.liquid file. It may be different according to your theme. (Please be informed that different Shopify themes use different names for this template. This is not always cart.liquid or cart-template.)
Step 5: Now, add the below CSS on top of the cart page template (liquid) file.
<style>
.multivariants_cart_quantity_box{pointer-events: none;}
</style>
Step 6: Find out the quantity input box or the box holder parent DIV from the shopping cart page. Check the quantity box parent div on the shopping cart page through your browser and then go to cart-template.liquid.
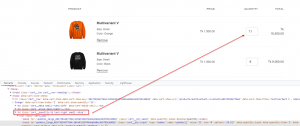
Step 7: Now, you need to go to the cart-template liquid to look for the div from where the quantity box is coming. You should already have seen the div following step 6.
After getting the div, you would have some class already added in that div. Now we need to add another class to that existing class.
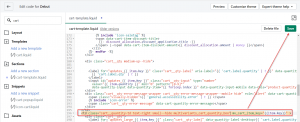
add the following CSS class and attribute. It should be in the same class as shown in the attached image.
multivariants_cart_quantity_box” mv_cart_item_key=”{{item.key}}”
OR
mv_cart_item_key=”{{line_item.key}}”
After adding the class it should look like this:
class=”[existing class] multivariants_cart_quantity_box” mv_cart_item_key=”{{item.key}}”
OR
class=”[existing class] multivariants_cart_quantity_box” mv_cart_item_key=“{{item_line.key}}”
Make sure to use the “” sign for the attribute.
Step 8: Save it and see the changes on the cart page.
If you still face any difficulties or are not confident enough to update the liquid file, NO WORRIES!
Just contact our support through Live Chat, ticket, or email, our team will be happy to assist you.