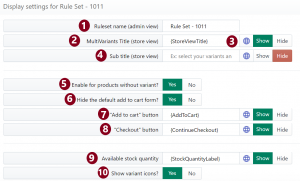
1. Ruleset name:
Here, you can set the name of your ruleset so that you can identify which product is using which ruleset. This ruleset name will show in your admin panel but it will not be displayed on the frontend.
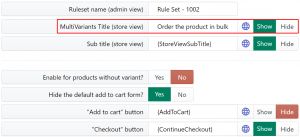
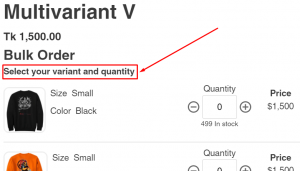
2. MultiVariant Title(store view):
By using it, you can provide a name for the ruleset. It will show on the top of the variants listing. By default, the name is ‘Bulk Order’. If you want you can show/hide the ruleset by clicking on the show/hide button. If you click on a show it will show on the product page and if you click on hide then it won’t be visible anymore.
This is how it appears on the product page: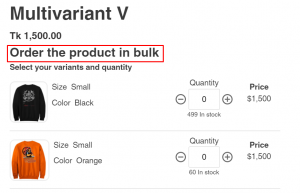
3. Globe icon:
If you click on the globe icon then it will fill that particular text field with the translated data you entered in the “Language & Translation” settings. This button is helpful to reset the label to default.
4. Subtitle (store view):
You can add a subtitle for your ruleset to provide more info to your customers. It will show on the product page below the name of your ruleset.
If you want, you can hide the subtitle from showing on the product page.
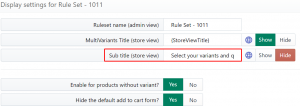
The image below shows how the subtitle will be displayed on the product page:
5. Enable for products without variant:
MultiVariants also work for non-variant products. Click on YES to activate MultiVariants for those products which have no variant.
6. Hide the default add to cart form
When you Activate the App, it automatically hides the default Shopify “Add to cart” form and shows the list of variants with it’s own Add to Cart button. It is necessary to avoid confusion. Because if customers choose different items of the product through MultiVariants variants listing and click on the Shopify default add to cart button then the quantity information of different variants won’t carry forward to the order file. Also, if you don’t hide the default Add to Cart button, then there will be two Add to Cart buttons on the product page.
The MultiVariants Add to Cart button is customizable. So if needed, you can easily change the button style and color to match your theme. You can do it from Theme Setting or simply knock the support team on live chat, they will help you out.
By default, the default buttons are hidden. but if you still need to show the default button then click on NO and save it.
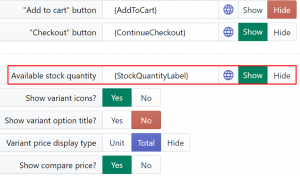
7. Add to cart button:
This is the title field for the ‘Add To Cart’ button. In this field, you can change the title of the button. You can also choose whether to show or hide the button.
If you hide it, the button will disappear from the product page.
8. Checkout button:
Likewise the cart button title, here you can change the Checkout button title. Also, you can decide to hide the button from the product page. Click on HIDE to remove the button from your variant listing on the product page.
9. Available stock quantity:
You can Show/Hide the available quantity of each variant of the product. You can also edit the text and format of this label.
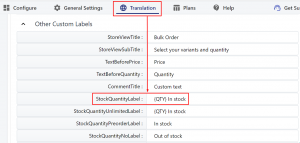
By default, it will follow the ‘Number’ before ‘Quantity’ format (for ex:: 22 available). But you can change the order (available 22).
To do it-Go to “Language & Translation”
>> Other custom labels
>> Find ‘StockQuantityLabel’ from the left side listing
>> now interchange the position of {QTY} and available
Also,
10. Show variant icons:
If you want, you can show or hide the icon of your variant. The variants icons come from the Shopify variants icon (is any). This option gives you the control to show or hide the icon of the product variants from the product page.
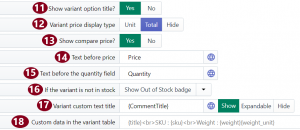
11. Show variant option title:
This is for the option title that you set in Shopify. For example Color, Size, Material, etc. MultiVariants displays the option name before each variant. If you don’t want to display the option title for the variants, click on ‘No’ and Save the change.
12. Variant price display type:
MultiVariants shows the price for each variant on the product page. The price multiplies with the quantity and shows the total price for each variant. Or you can change it to UNIT PRICE to show only the unit price, then the price will not change with the quantity.
And, select ‘Hide’ if you don’t want to display the price.
13. Show compare price:
If you have the “Compare Price” set in Shopify, then you can show the compare price through MultiVariants also. Click on Hide if you don’t need this.
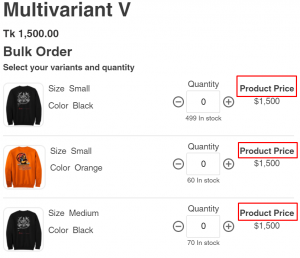
14. Text before price:
This ‘Price’ title will show up or before the price of each variant. You can change it to your title. Initially, it shows “Price”. If you don’t want to show anything here, keep it blank.
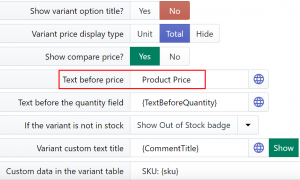
As an example, the price title is changed to “product price” and this is how it appears on the product page.
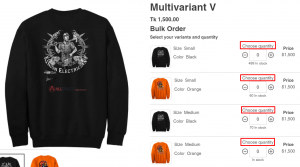
15. Text before the quantity field:
You can change the quantity label to your preferred title in this field. It will change the label on the product page. By default, it shows the text as “Quantity” but if you want you can change it or remove it. To remove it, remove everything from that box.
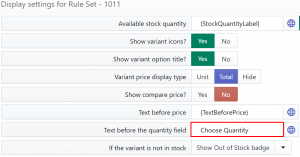
As an example, the “Quantity” title is changed to “Choose quantity” and this is how it appears on the product page.
16. If the variant is not in stock:
You can change the settings for variants that are Out of Stock. If you specify “Show variants”, then the variants will be shown but customers can’t add them to the cart.
For “Hide Variants”, the variants that are Out of Stock will be removed automatically from the product page.
And the Show “Out of Stock badge” will display the out-of-stock badge.
17. Variant custom text title:
MultiVariants offers a custom text field where customers can write notes that you will receive with the order file. This text field will appear under each variant.
The default title for this text field is “Custom Text”, you can change the title from here. Also, if you don’t need this field, just click on Hide.
18. Custom data in the variant table:
This helps you to show additional labels on the product page. Such as you can display SKU, weight, weight unit, etc for each variant. Or you can use any additional message here for each variant of the product. For example, if you set “SKU: {sku}” in this field, on the product page, it will display “SKU: 1254KL90”. Here SKU is the label, and {sku} is an HTML tag that will show the individual SKU that you set in Shopify.
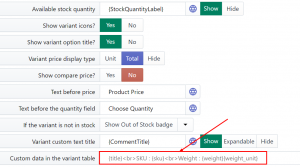
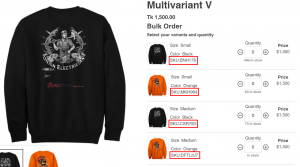
As an example, the “Custom” field is used to display the SKU from Shopify and this is how it appears on the product page:
Still, if you face any further issues or need help, feel free to contact us. Our support team will be happy to help you.
You can always reach us via
- Support ticket from MultiVariants app
- Live Chat in MultiVariants app
- Direct email to support@multivariants.com
So, Good Luck! And happy selling with MultiVariants.