Quantity Selector Dropdown In Shopify
For many Shopify merchants, customization of the quantity input field on the product page is required to improve the average order value.
With default Shopify functionality, merchants can allow their customers to input the quantities of the items in a fairly basic way. Customers can type in a number by hand or go up and down using arrow signs on the product page.
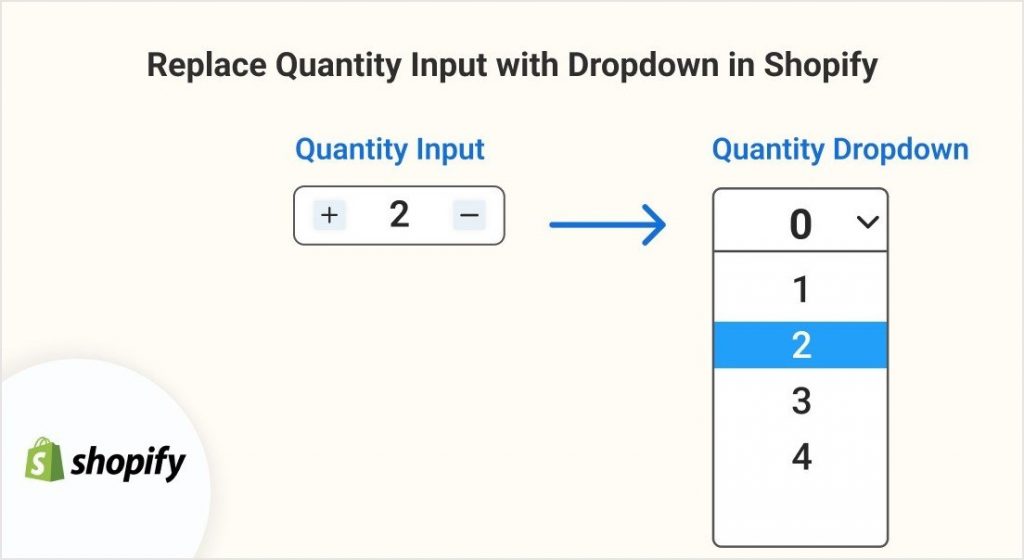
But for some advanced business models or types of products, Shopify merchants might require to create a quantity selector dropdown in Shopify stores to encourage easy orders.
The quantity selector dropdown in Shopify is an easy option for customers. Changing the quantity selector to a dropdown saves customers time allowing them to just click on the amount of the items they wish to order. Merchants also benefit from this as they can preset some values to be reflected in the quantity dropdown and restrict customers from choosing from the given values.
In this article, you will get to know all the possible ways to change the quantity input into a dropdown in your Shopify store.
How To Add a Quantity Selector To Product Pages In Shopify Store
There are 3 ways you can change quantity input into a dropdown. You will know all the ways step by step. Find your desired one, apply it and grow your business.
- Edit Shopify Theme Code (Advanced users)
- Hire a Shopify Developer
- Use a Shopify App (No coding experience required)
#1. Edit Shopify Theme Code
If you are technically skilled, you can easily add a Shopify custom quantity selector dropdown by editing the Shopify theme code. To add this Shopify quantity selector code, just follow the below steps –
- Go to your Shopify admin
- Go to the Online store
- Click on Themes
- Select the theme you want to edit
- Click on Actions > Edit code
- In the Sections, directory click on product-template.liquid (Debut theme)
7. Copy and paste the below code into the exact position where you want to see your quantity selector dropdown.
[html]
<p class=”cart-attribute__field”>
<label>Quantity</label><br>
<select required class=”required” id=”quantity” name=”attributes[Quantity]”>
<option value=”1″{% if cart.attributes[“Quantity”] == “1” %} selected{% endif %}>1</option>
<option value=”2″{% if cart.attributes[“Quantity”] == “2” %} selected{% endif %}>2</option>
<option value=”3″{% if cart.attributes[“Quantity”] == “3” %} selected{% endif %}>3</option>
<option value=”4″{% if cart.attributes[“Quantity”] == “4” %} selected{% endif %}>4</option>
<option value=”5″{% if cart.attributes[“Quantity”] == “5” %} selected{% endif %}>5</option>
<option value=”6″{% if cart.attributes[“Quantity”] == “6” %} selected{% endif %}>6</option>
<option value=”7″{% if cart.attributes[“Quantity”] == “7” %} selected{% endif %}>7</option>
<option value=”8″{% if cart.attributes[“Quantity”] == “8” %} selected{% endif %}>8</option>
<option value=”9″{% if cart.attributes[“Quantity”] == “9” %} selected{% endif %}>9</option>
<option value=”10″{% if cart.attributes[“Quantity”] == “10” %} selected{% endif %}>10</option>
</select>
</p>
[/html]
8. Put the code in a different location in product-template.liquid to find the exact position.
9. Click on Save.
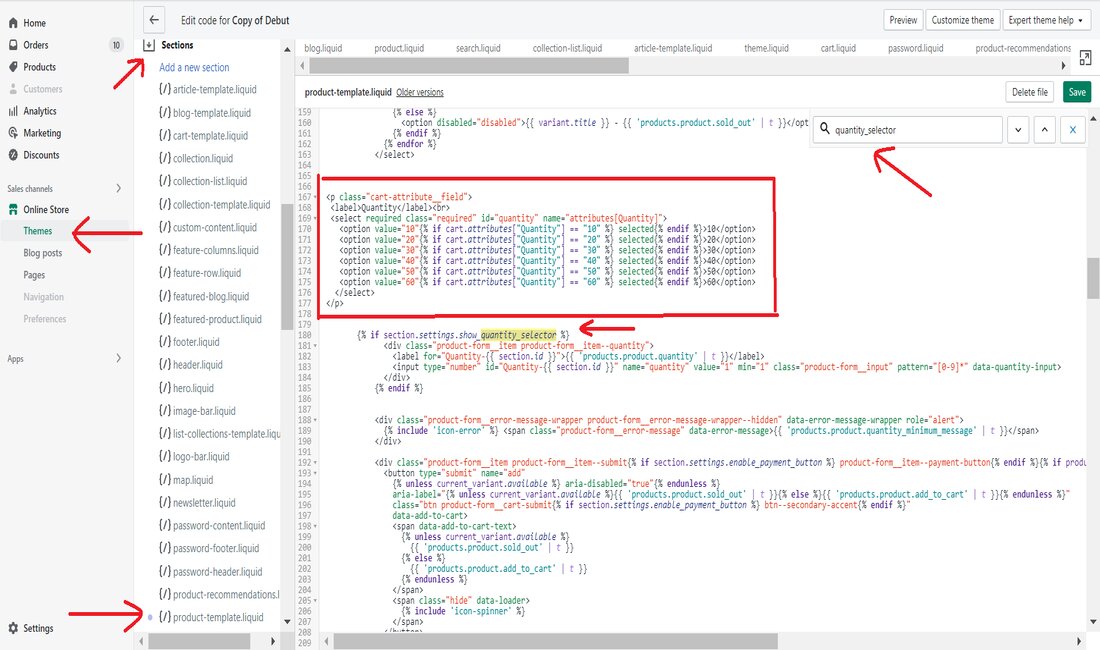
Here is a sample preview of a Shopify admin where to add the code –

This will show something like the below image –

If you want to preset some bundle quantity (For example 10, 20, 30, 40, 50) and show it in the dropdown, look into the code and just change the values to 10, 20,30, and so on. Here is the code and instead of the above code, copy and paste the below code –
[html]
<p class=”cart-attribute__field”>
<label>Quantity</label><br>
<select required class=”required” id=”quantity” name=”attributes[Quantity]”>
<option value=”10″{% if cart.attributes[“Quantity”] == “10” %} selected{% endif %}>10</option>
<option value=”20″{% if cart.attributes[“Quantity”] == “20” %} selected{% endif %}>20</option>
<option value=”30″{% if cart.attributes[“Quantity”] == “30” %} selected{% endif %}>30</option>
<option value=”40″{% if cart.attributes[“Quantity”] == “40” %} selected{% endif %}>40</option>
<option value=”50″{% if cart.attributes[“Quantity”] == “50” %} selected{% endif %}>50</option>
<option value=”60″{% if cart.attributes[“Quantity”] == “60” %} selected{% endif %}>60</option>
</select>
</p>
[/html]
This will show something like the below image –

Now, if you want to show more preset values like 70, 100, and others, just add more code lines.
[html]
<option value=”70″{% if cart.attributes[“Quantity”] == “70” %} selected{% endif %}>60</option>
<option value=”100″{% if cart.attributes[“Quantity”] == “100” %} selected{% endif %}>60</option>
[/html]
If you need any changes in the design to adjust your theme, go to theme.scss.liquid file and add some custom CSS.
Hire A Shopify Developer
Hiring a Shopify developer is a good option for creating a dropdown for quantity selectors on your product page. Remember, contacting an expert does not mean you are committed to hiring him/her. Before hiring an experienced developer keep the following points in mind –
- Do preliminary research on how you want to implement the product quantity dropdown. Find a similar example in other businesses. This will help you to make the developer understand better.
- Define your budget and timeline clearly. Prepare a detailed description so the developer can provide you with an accurate quote.
How To Hire A Shopify Expert
It is not necessary to choose the expert working nearby. As you can communicate remotely, navigate the Shopify Experts Page and find your expert without bothering about the location.
Use a Shopify App (easy option)
As you can see, you have multiple options if you are looking for ways to customize your Shopify quantity input. But if you are a non-technical person and not willing to spend too much money hiring a developer, the recommended option is to use an app for your Shopify store. For instance – integrating the MultiVariants – Shopify quick order app will let you take complete control of the quantity input on your product page without having to edit any code. It also works on your cart page as well.
With this suitable Shopify app installed on your store, get the real power of setting quantity rules. Set these rules for an individual product, product variations, or product categories and reflect them accordingly on the quantity dropdown menu.
With this app, set any quantity rules and display them accordingly on the quantity dropdown menu. Here is what you can do with the MultiVariants Shopify app –
- Set a preset bundle quantity (dropdown) instead of the regular quantity input box. Allow customers to select from the preset product quantities like 5, 10, 20, 50, and 100.
- Check the available inventory quantity automatically and change the values in the quantity selector dropdown. Suppose you have set up to 10 to show in the dropdown, but the product has 5 items left. Now, you want the dropdown to reflect 1-5 automatically.
- Set the quantity selector dropdown for any individual product or the variations of the product.
You can also install MultiVariants on your Shopify store for a 3-day free trial and get help from a 24/7 technical support team. The app saves customers valuable time while placing orders on your product page and MultiVariants has good reviews from many Shopify merchants.
Here is a sample view of MutiVariants showing quantity selector dropdown in Shopify –

Final Thoughts
So, now you know how to change the normal quantity input box into a quantity selector dropdown in Shopify. This Shopify quantity selector dropdown will help grow your sales volume. Because through the quantity dropdown you can show your preset bundle quantities or the incremental increase quantities or however you wish to set the quantity rules.
