Managing a wholesale product catalog on Shopify is no small task. When dealing with hundreds (or thousands) of SKUs, updating them one at a time simply does not scale. Manual edits can eat up hours, whether adding a new seasonal collection or adjusting wholesale pricing across your entire store. This can lead to mistakes as well.
That’s where bulk import-export comes in. This simple but powerful workflow lets you manage massive product updates simultaneously. With the right approach, you can cut update times from hours to minutes, keep your wholesale data consistent, and always stay in control – no developer is needed.
In this guide, we’ll show you exactly how to:
- Upload wholesale products in bulk
- Export your catalog for backups or edits
- Avoid common CSV upload mistakes
- Choose the right tools for your Shopify store
Let’s get into it.
Table of Contents
What Is Bulk Import-Export and Why Does It Matter for Wholesale Stores
Managing a large number of products one by one can be extremely time-consuming. Bulk import-export solves this issue.
You update all your products in a spreadsheet instead of editing each item individually in Shopify. Then, you upload that file, and your catalog is complete. This process works in the same way when you need to export your product list.
Here’s what makes bulk import/export better than manual edits:
- It’s faster. You can update hundreds of products at once.
- It’s cleaner. Fewer chances of messing something up.
- It’s reusable. Keep your templates for next time.
If you run a wholesale store, this feature is particularly important. You likely:
- Sell a large catalog
- Use different prices for various buyers
- Manage inventory across multiple warehouses
- Update items frequently
If you perform all these tasks manually, it may lead to errors and disorganization. Bulk import/export saves time, reduces errors, and helps you stay organized.
This isn’t about fancy tools. It’s just a simple way to keep up when your store gets big. Once you try it, it’s hard to go back.
Use Cases For Bulk Import Export For Wholesale Products
Running a wholesale store involves juggling product updates, pricing, and inventory. Bulk import-export enables you to manage everything faster and with fewer mistakes.
Here’s how real B2B merchants use it:
- Set wholesale pricing in one file: Laird Superfood used Shopify CSV upload to manage unlimited volume-based price lists and update pricing quickly across large catalogs.
- Upload new seasonal products: You prepare new lines in a spreadsheet and import them all at once — no need to rebuild listings by hand.
- Keep inventory synced: Use a CSV to update stock levels across warehouses or from supplier feeds without clicking into every product.
- Share product data: Export your complete list for sales reps, distributors, or marketplaces. It’s easy to give others a clean file.
- Back up before significant updates: Export your catalog before redesigns or major theme changes. If something breaks, you’ve got a clean copy to restore.
These actions save hours every week. They also cut down on typo mistakes, mispriced items, and mis-stocked product views. Once you start using bulk import/export tasks, you will come to hate making quick spreadsheet edits. You stay more organized as your store grows.
Shopify’s Built-In CSV Tools: What They Can (and Can’t) Do
Shopify has a simple way to update your products in bulk. You’ll find it under Products > Import/Export in your admin. It works through CSV files, just spreadsheets saved in a special format.
Here’s what you can do with it:
- Upload product data from a spreadsheet
- Download your catalog to edit or save as backup
- Change key details like names, descriptions, prices, stock, and variants
- Update products without deleting anything
What works well:
- It’s free
- No extra tools or apps
- Suitable for small or simple product lists
What’s tricky:
- You have to follow the exact format. Wrong headers or typos can break the upload.
- It doesn’t support custom wholesale pricing.
- Shopify won’t flag minor errors, so a tiny mistake can affect hundreds of items.
If you’re using this, double-check your file before uploading. Stick to Shopify’s format. And always start with a small test file.
For official help, visit the Shopify Help Center.
How to Bulk Import Products into Shopify (Step-by-Step)
If you’re managing a large catalog, adding products one by one simply doesn’t cut it. Shopify CSV uploads allow you to handle everything in one go, faster and with fewer mistakes.
In this section, you’ll learn how to set up your product file, follow Shopify’s format, and upload it correctly. Whether you’re launching new items or updating existing ones, getting this process right can save you hours and help keep your store running smoothly.
- Download the Shopify CSV Template
- Fill in Product Information Correctly
- Upload the File into Shopify
Step 1: Download the Shopify CSV Template
Start with Shopify’s official CSV template. Using their format saves you from upload errors later. The column names must match exactly. Otherwise, Shopify won’t know what to do with your data.
Once downloaded, open the file in Google Sheets or Excel. Google Sheets works best if you’re collaborating with others. It’s also safer, since Excel sometimes messes up formatting (like turning SKUs into dates). Stick to the structure, and you’re off to a solid start.
Step 2: Fill in Product Information Correctly
This part takes a little time, but it’s worth doing right. Filling out your product data properly saves you from rework and makes your catalog easier to manage.
Key fields to include:
- Handle: The unique name for each product (no spaces). This tells Shopify how to group variants.
- Title and Body (HTML): Your product name and description. Keep it clean and clear.
- Vendor and Product Type: Helps organize your catalog and sort products inside Shopify.
- Variants: Add SKUs, prices, inventory, and option values like size or color. This is where most mistakes happen. So double-check everything.
- Tags and Metafields: These are helpful for filtering, custom logic, or showing extra info.
For wholesale stores, go a bit further:
- Use tags or metafields to mark products by buyer group, price tier, or deal type.
- If you’re using a third-party B2B app, add custom price fields or reference IDs now so they’re picked up later.
Take your time here. This is the backbone of your catalog.
Step 3: Upload the File to Shopify
Once your file is ready, head to your Shopify admin. Go to Products > Import and click “Add file.”
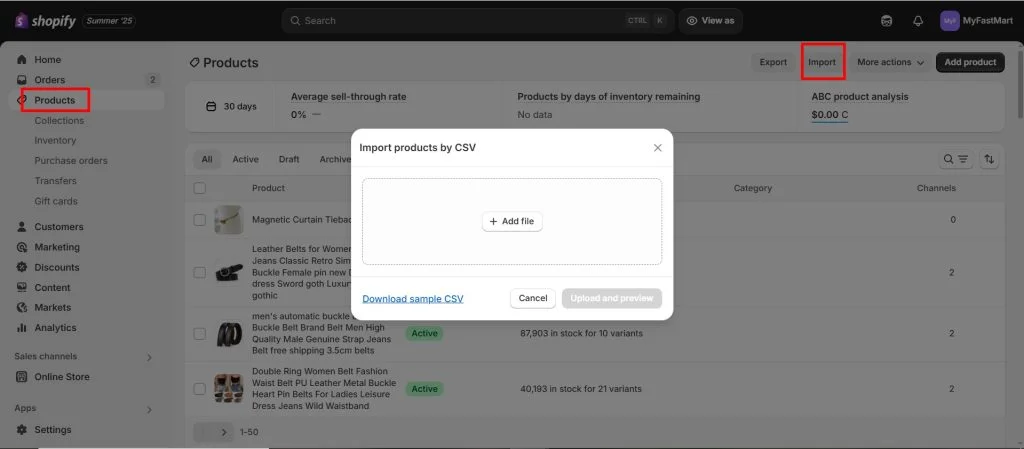
Choose your completed CSV and hit “Upload and continue.” Shopify will show you a preview of what’s about to change. This is your last chance to catch errors.
Check the columns. Make sure the product count looks right. If you update existing products, Shopify will match them by the “Handle” column. If that’s off, you could accidentally create duplicates.
Click “Import Products” when you’re ready. The upload can take a few seconds or several minutes, depending on how many items are in the file. You don’t need to refresh. Shopify will handle it. Just don’t try to upload another file while one is still processing.
Once the upload is done, spot-check a few products in your store to confirm everything looks right. If something goes sideways, you can always re-upload the file or restore it from a backup. Better safe than stuck cleaning up one product at a time.
How to Export Wholesale Products from Shopify
Need a copy of your product list? Maybe you’re updating prices, making backups, or handing off a list to your sales team. Whatever the reason, Shopify’s export tool can help. It’s quick once you know where to look.
Go to Products > Export in your Shopify admin. Then choose what you want to pull:
- All products
- A filtered list by vendor, tag, or collection
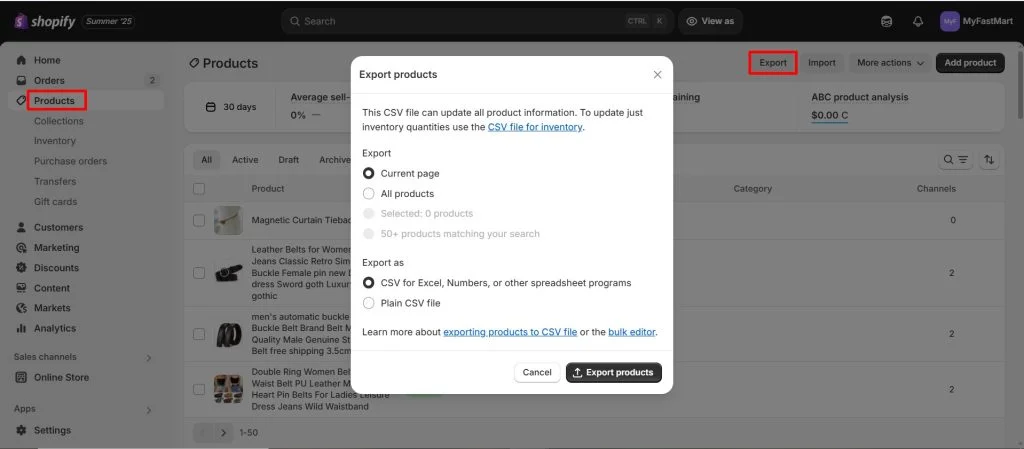
Pick the format. CSV for Excel is usually best. It opens easily, and you can tweak it later. Once ready, hit “Export.” You’ll either get a download or an email with a file link.
The part most people skip is naming and storing the file correctly. Don’t call it “product-export-final-final-V3.csv”. That’ll come back to haunt you.
Instead, build a folder system that makes sense. Something like:
- Exports/2025/July/full-catalog-backup.csv
- Exports/2025/July/vendor-products-tagged-b2b.csv
If you or someone on your team needs it next week or next month, you won’t waste time guessing.
One last thing: exporting isn’t just for backups. It’s a smart way to prep for edits, clean up messy data, or double-check what’s live. And when your catalog starts growing fast, having clean exports saved by date can be a lifesaver.
It’s one of the simplest habits you can build for smoother wholesale product management down the line.
Common Bulk Import/Export Errors (and How to Fix Them)
Shopify CSV uploads can be fussy. One small mistake and Shopify might reject the whole file. Here’s what usually goes wrong and how to avoid it:
- Missing headers: Every column needs to match Shopify’s exact format: no extra spaces, no renaming. If a required column is missing (like “Title” or “Handle”), the upload fails.
- Duplicate SKUs: Every variant must have a unique SKU. Repeated SKUs confuse Shopify and can overwrite your data by mistake.
- Variant errors: If you sell sizes or colors, ensure they line up. Don’t list a “Size” without giving a value like “Medium.” And don’t mix up “Color” and “Option1 Name.”
- Excel formatting bugs: Excel sometimes turns SKUs into dates or trims zeros (like turning “00123” into “123”). Use Google Sheets if you’re not sure or check formatting before saving.
Always export a backup before importing a new file. If something breaks, you’ll have a clean copy to restore things quickly.
Bulk Import/Export Tips for Smooth Wholesale Management
Want fewer upload errors and less stress? These small habits can make bulk editing much easier.
- Validate CSVs with tools like CSV Lint: A quick check before uploading can catch broken rows, missing commas, or bad formatting that might crash your file.
- Group products by catalog, collection, or season: Instead of uploading everything individually, split products into manageable groups. Easier to track and fix if something goes wrong.
- Name files clearly: Use names like “Fall2025_wholesale_upload.csv”. Avoid random file names like “update_final_3.csv”. Clear names = less confusion.
- Keep a changelog: Make a simple doc with the upload date, file name, who uploaded it, and what changed. Helps you (and your team) backtrack when needed.
- Schedule weekly exports: Set a calendar reminder to export your full catalog once a week. It only takes a minute and gives you a reliable backup.
Final Checklist for Managing Wholesale Products with Bulk Export
Before you hit “Import,” make sure you’ve checked every box:
✅ CSV template is correctly filled
✅ SKUs and variant data match
✅ Wholesale pricing is double-checked
✅ Backup export is saved
✅ Errors are resolved or flagged
Before you hit upload or send that file to your team, run through this quick list. It’ll save you time (and cleanup later).
✅ File is saved with a clear name and date
✅ You chose the right export type (full vs. filtered)
✅ Format is set to CSV for Excel (not plain CSV)
✅ Products are sorted or tagged correctly
✅ Backup is stored in the right folder
Wrapping Up: Save Time and Stay in Control
If you’re on Shopify, bulk import export for wholesale products isn’t optional. It’s essential! It keeps your store running efficiently, even as your catalog grows.
Start small. Test with 10–20 products. Once you’re confident, scale up and build a repeatable system that supports your business long-term.
FAQs About Bulk Import/Export on Shopify
How many products can I import at once on Shopify?
Shopify doesn’t have a strict limit, but large files (10,000+ rows) may need to be split to avoid timeouts.
Can I import wholesale pricing?
Yes. Shopify doesn’t support tiered pricing natively. Use tags/metafields or third-party B2B apps.
What’s the difference between exporting for Excel vs. backing up?
Excel format is easier to edit. Backups should be untouched exports saved before changes.
Can I bulk update inventory only?
Yes. You can export products, edit only the inventory columns, then re-upload.