The Text option in MultiVariants lets customers enter custom text when ordering a product. You can use a short single-line field or a longer text area, set a maximum character limit, make the input required, apply optional add-on pricing, and display one shared text field or a separate field for each variant.
Before You Start: Make sure the product is included in the ruleset where you want to add the Text option. The option will appear on products that the ruleset applies to.
If you are new to Product Options, first see how to set up Product Options in MultiVariants.
How to Set Up a Custom Text Option
Follow these steps to create and configure a Text option.
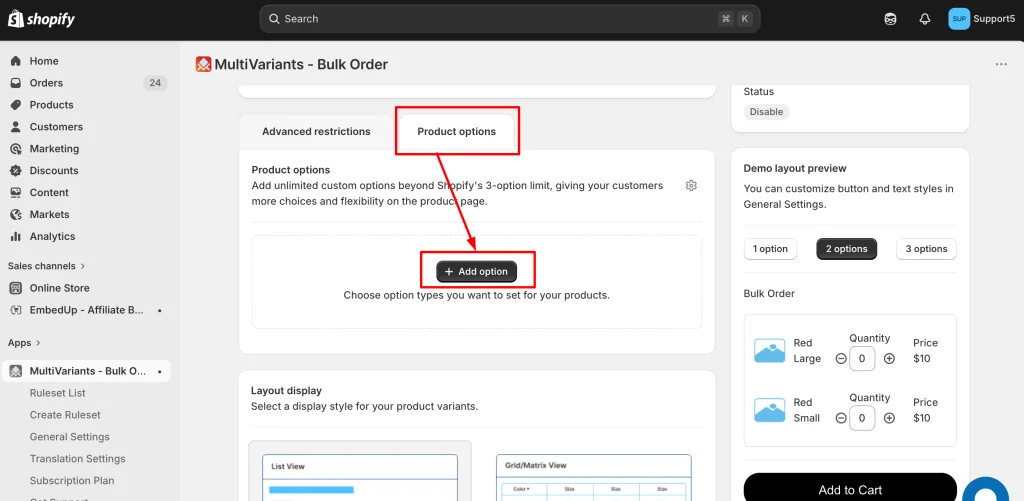
Step#1 Open Product Options
>> Go to the MultiVariants dashboard, open an existing ruleset or create a new one, open the Product Options tab, and click + Add option.
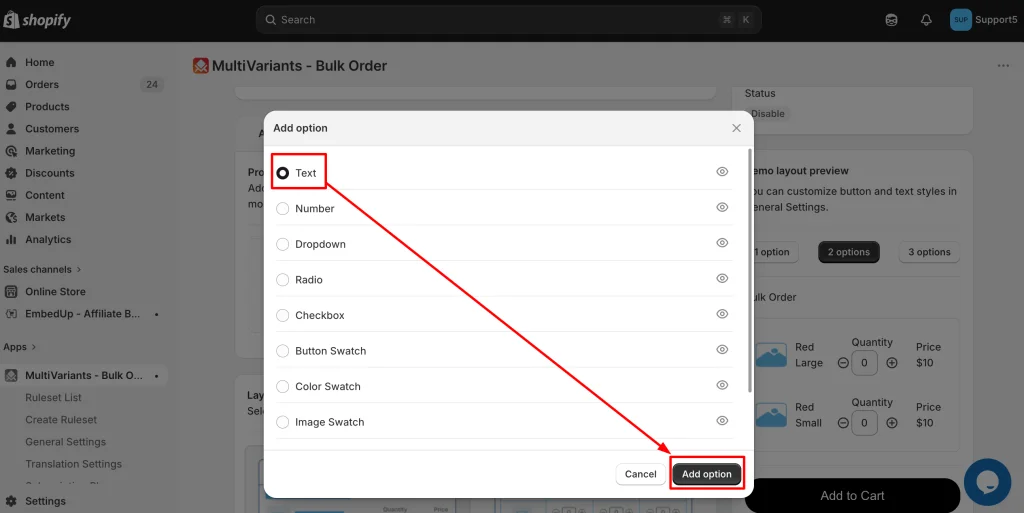
Step#2 Select the Text Option
>> Select Text from the available option types and click Add option.
Step#3 Configure the Text Option Settings
>> Configure the fields based on how you want customers to enter text on the storefront.
Input type — choose Short text for a single-line input or Long text for a multi-line text area when customers need to enter longer messages.
Option title — enter the heading customers will see above the text field, such as “Personal Message.”
Short description — add an optional short description near the option title to explain what customers should enter.
Placeholder text — enter optional example or instruction text that appears inside the empty field, such as “Add your name here.”
Help text — add optional instructions or supporting information below the text field.
Maximum character — set the maximum number of characters customers can enter. Once the limit is reached, they cannot enter additional characters.
Price — enter an optional add-on price for the Text option. Leave it blank if entering text should not add an extra charge.
Choose how the add-on price is calculated:
Single word — charges the entered price for each word the customer types.
Per character — charges the entered price for each character the customer types.
Entire text — applies the entered price once, regardless of how many words or characters the customer enters.
Required — set to Yes if customers must enter text before adding the product to the cart.
Display on each variant — leave this unchecked to show one shared text field above the bulk-order section. Check it to display a separate text field under each variant row so customers can enter different text for individual variants.
Set product option price logic — choose how often the calculated Product Option price is applied based on the quantity or variants ordered:
Per unit — applies the price to each unit ordered.
Per selected variant — applies the price once for each selected variant.
Once per product — applies the price once for the product, regardless of quantity or selected variants.

Example: For an engraved product, you could use Short text, set the option title to “Engraving text,” limit the input to 20 characters, and make the field required.
Step#4 Save the Text Option
>> Click Save in the top save bar after reviewing the Text option settings.
Step#5 Test the Text Option on Your Storefront
Open a product page where the ruleset applies and test the Text option. Confirm that the correct input type appears, the character limit works as expected, required input is enforced, any add-on price is calculated correctly, and the entered text remains attached when the product is added to the cart.
Manage Text Option Placement and Styling
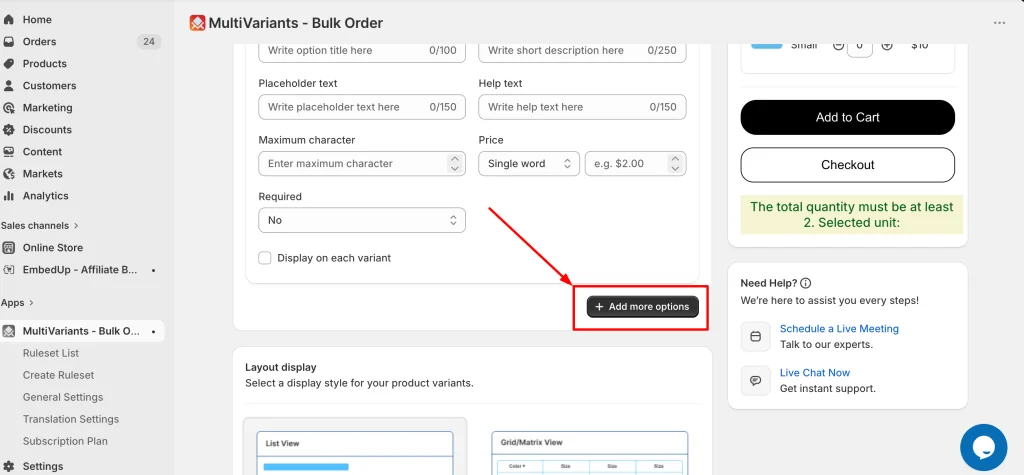
Add Another Product Option
>> Click + Add more options if you want to add another Product Option to the same ruleset.
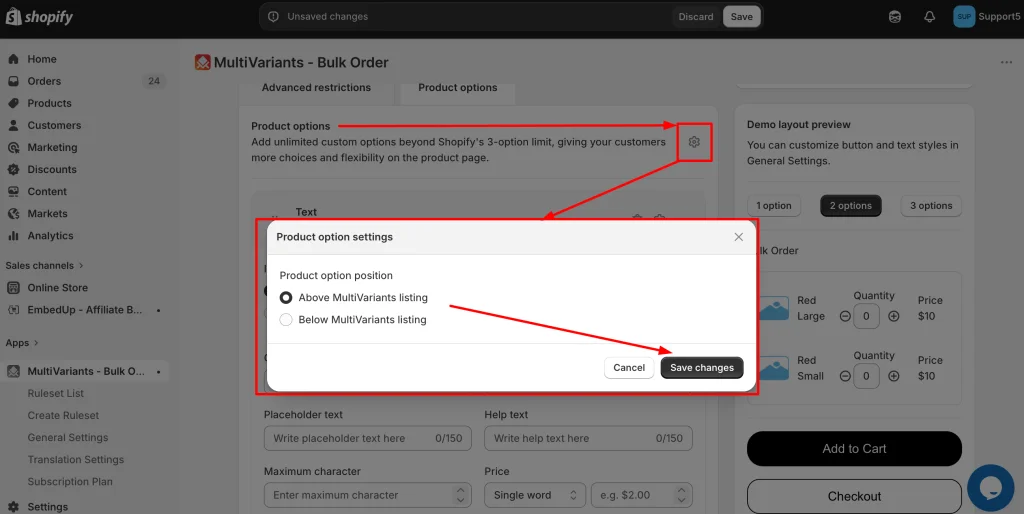
Choose the Text Option Placement
Placement — determines whether the Text option appears above or below the MultiVariants listing on the product page.
>> Click the gear icon at the top of the Product Options tab, select Above MultiVariants listing or Below MultiVariants listing, and click Save changes.
Customize the Text Option Style
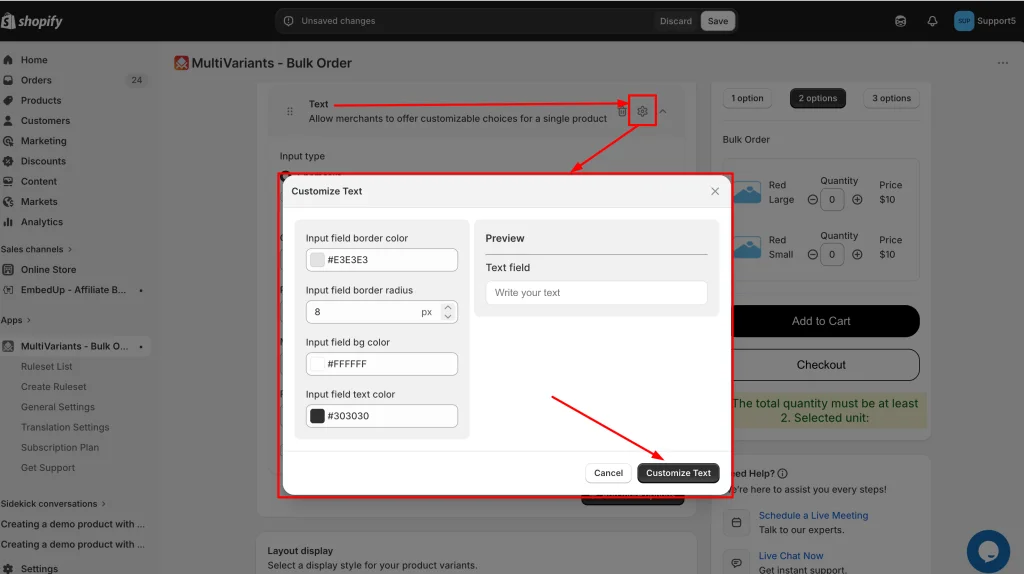
>> Click the gear icon at the top-right of the Text option card to adjust the available styling settings, including border colors, background, text color, and border radius. Click Customize to apply the changes.
Common Issue
Customers can add the product without entering text
Set Required to Yes if customers must complete the Text option before adding the product to the cart.
Customers cannot enter their full message
Check the Maximum character setting. Increase the limit if customers need to enter longer text.
The text field is too small for the information customers need to enter
Change Input type from Short text to Long text to display a multi-line text area.
Entering text adds an unexpected charge
Check the Price and price calculation settings. Remove or update the price if completing the Text option should not add an extra charge.
I need different text for each variant
Enable Display on each variant to show a separate text field under each variant row.
Need Help?
If the Text option does not appear on the storefront, character limits or add-on pricing are not working as expected, or you need help configuring the option, contact the MultiVariants support team.
You can always reach us via
💬 Live Chat: in MultiVariants app
📧 Email: support@multivariants.com
📅 Live Meeting: https://calendly.com/efolisupport